How to Replace a Trailer Axle Bearing: Step-by-Step Guide
A complete DIY tutorial for safely removing, inspecting, and installing trailer hub bearings — with torque specs, tool lists, and pro tips.Quick Summary: Replacing a trailer axle bearing requires removing the hub, extracting the old bearing and race, cleaning the spindle, installing new components with fresh grease, and torquing the castle nut to specification. This guide covers the entire process for the two most common bearing sets: 1-1/16″ × 1-3/8″ (LM48548/10 + LM67048/10) and 1-3/8″ × 1-3/4″ (25580/20 + 15123/15245).
Introduction
Trailer bearings are easy to ignore — until one fails at 65 mph on the interstate. A seized or overheated bearing can weld itself to the spindle, destroy the hub, and in worst cases, cause wheel separation. The good news: with the right tools and about 90 minutes per wheel, you can replace your own trailer axle bearings in your driveway and save hundreds in shop labor.
This guide applies to the vast majority of American-made and imported utility, boat, and cargo trailers using tapered roller bearings. If your trailer uses oil-bath hubs (common on large goosenecks), the process differs slightly — see the notes in Step 6.
Tools and Materials You’ll Need
Tools:
- Socket set (1/2″ drive, including 1-1/4″ or 1-1/2″ socket for castle nut)
- Torque wrench (50–150 ft-lb range)
- Flat-head screwdriver or seal puller
- Brass drift punch or hardwood block (for race installation)
- Dead-blow hammer
- Wire brush + shop rags
- Bearing packer (or grease-proof gloves for hand-packing)
Materials:
- Replacement bearing set (inner + outer bearing + races + seal)
- High-temperature wheel bearing grease (NLGI #2, marine-grade if boat trailer)
- Replacement cotter pin or tang washer
- Brake cleaner or mineral spirits
- Disposable gloves and shop towels
Before You Start: Identify Your Bearing Size
Trailer bearings are not one-size-fits-all. Check the face of your existing bearings for the part number stamped into the cone. The two most common configurations on American trailers are:
| Capacity | Inner Bearing | Outer Bearing | Seal ID |
|---|---|---|---|
| 2,000–3,500 lb | LM48548 / LM48510 | LM67048 / LM67010 | 1.50″ (171255TB) |
| 5,200–7,000 lb | 25580 / 25520 | 15123 / 15245 | 2.13″ (21333TB) |
If the bearing numbers are worn off, measure the spindle seat diameters with a caliper. The trailer axle bearing catalog on our site matches spindle measurements to bearing sets by load capacity.
Step-by-Step Bearing Replacement
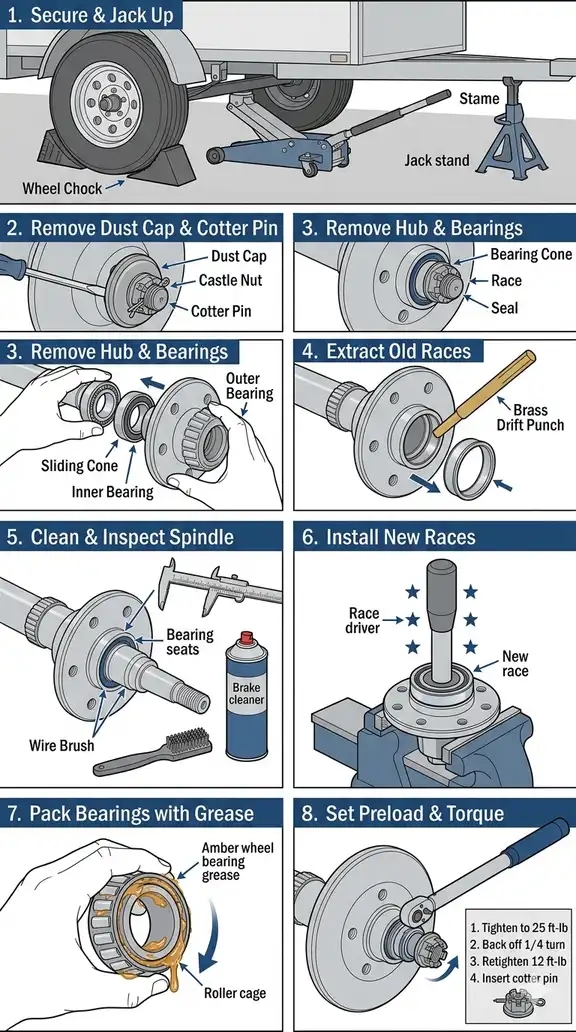
1 Secure the Trailer and Remove the Wheel
Park on level concrete. Chock the opposite wheel. Loosen lug nuts before jacking. Raise the trailer with a floor jack under the frame (never the axle tube), support with jack stands, and remove the wheel. If your trailer has electric brakes, disconnect the wiring harness to the magnet before proceeding.
2 Remove the Hub / Drum Assembly
Pull the rubber dust cap off the hub center. A flat screwdriver tapped into the gap usually pops it free. Remove the cotter pin from the castle nut using pliers or side cutters. Unscrew the castle nut (typically 1-1/4″ or 1-1/2″ socket, lefty-loosey). Remove the washer and outer bearing cone — it should slide out by hand or with a gentle twist of the hub.
Now pull the hub/drum straight off the spindle. The inner bearing and seal will come out with it. Set the hub face-down on a clean surface to avoid contaminating the brake shoes.
3 Extract the Old Bearings and Races
Pry the grease seal out from the back of the hub using a seal puller or flat screwdriver. Work carefully around the perimeter to avoid scoring the hub bore. The inner bearing will fall out once the seal is removed.
Now remove the bearing races (the steel cups pressed into the hub). Most DIYers don’t own a slide hammer and race puller — and that’s fine. Place the edge of the hub over a vise or wooden block so the race is supported, then drive it out from the opposite side using a brass drift punch. Strike the opposite race, not the hub itself. The race should pop out in 4–6 firm hits. Repeat for the outer race.
4 Clean and Inspect Everything
Spray brake cleaner inside the hub to remove all old grease and metallic debris. Scrub the spindle with a wire brush and inspect for:
- Scoring or galling on the bearing seats — light scratches are acceptable; deep grooves mean spindle replacement
- Discoloration (blueing) — indicates prior overheating; the spindle hardness may be compromised
- Pitting or rust — minor surface rust cleans off; pitting means replacement
Run your fingernail across the bearing seats. If you feel a groove, replace the spindle or the entire axle. Replacement trailer axles are available in standard and custom lengths if the spindle is damaged beyond use.
5 Install New Races
Apply a thin film of grease to the outside of each new race. Place the outer race into the hub bore squarely. Drive it in using your brass drift or a dedicated race driver tool. Work in a star pattern — three taps at 12 o’clock, three at 4 o’clock, three at 8 o’clock — to seat the race evenly. You’ll hear the tone change from a hollow ring to a solid “thunk” when the race bottoms out against the shoulder.
Repeat for the inner race from the opposite side. The race must sit fully flush against the hub shoulder with no gap visible.
6 Pack the Bearings with Grease
Place the new inner bearing into a bearing packing tool and pump grease until it extrudes from the roller cage on all sides. No packing tool? Use the hand-packing method: scoop a palmful of grease and press the bearing edge into it, working grease between the rollers until fully saturated. Rotate the cage as you go.
Apply a light coat of grease to the inside of the hub cavity and the new race surfaces. Seat the packed inner bearing into the inner race, then tap the new grease seal into place using a seal driver or flat block. The seal face should sit flush with the hub edge.
7 Mount the Hub and Set Preload
Slide the hub onto the spindle. Insert the packed outer bearing into the outer race. Add the flat washer, then thread the castle nut by hand.
Now comes the critical step — setting the bearing preload. Follow this exact sequence:
- Tighten the castle nut to 25 ft-lb while rotating the hub by hand. This seats the bearings fully.
- Back the nut off 1/4 to 1/2 turn until it is finger-tight.
- Tighten again to 12–15 ft-lb for standard bearings, or until the castle nut slots align with the cotter pin hole — whichever comes first.
- Insert a new cotter pin through the castle nut and spindle hole. Bend the legs around the nut.
Tap the dust cap back into place with a soft-faced hammer. If your trailer uses Bearing Buddies or a grease zerk fitting, pump grease until the piston plate moves outward slightly — do not overfill, which can blow out the rear seal.
8 Reassemble and Road Test
Reconnect the brake wiring if applicable. Remount the wheel, tighten lug nuts to spec in a star pattern (typically 90–120 ft-lb for 1/2″ studs). Lower the trailer and re-torque the lug nuts after 50 miles.
For the first 20 miles, stop and feel the hub temperature at each rest stop. A warm hub is normal. A hub too hot to touch indicates over-tightening — jack up the wheel, back the castle nut off 1/16 turn, and re-pin.
Troubleshooting Common Issues
| Symptom | Cause | Fix |
|---|---|---|
| Hub gets hot after 10 miles | Castle nut too tight | Back off preload, re-torque to 12 ft-lb |
| Hub wobbles side-to-side | Bearing preload too loose | Tighten castle nut, check for worn races |
| Grease leaking from rear seal | Seal installed crooked or over-greased | Replace seal, reduce grease volume by 30% |
| Metallic grinding noise | Race not fully seated or wrong bearing | Disassemble, inspect race depth, verify part numbers |
| Brakes feel weak after reassembly | Brake magnet misaligned with hub drum | Check magnet gap (0.030–0.060″), adjust if needed |
How Often Should You Repack Bearings?
There’s no universal interval, but these guidelines keep you out of trouble:
- Standard utility trailers: Every 12 months or 12,000 miles
- Boat trailers (freshwater): Every 6 months — submersion during launch pushes water past the seal
- Boat trailers (saltwater): Every 3 months or after every launch day
- Car haulers / heavy equipment: Every 6 months regardless of mileage
Between services, pull the dust cap every 3,000 miles and visually inspect the grease color. Clean grease is tan or amber. Black grease means contamination (brake dust or water). Gray grease means metallic wear — replace bearings immediately.
When to Replace the Entire Hub Assembly
Sometimes the bearing isn’t the problem — the hub is. Replace the complete hub assembly (not just bearings) if:
- The bearing seats in the hub are scored, oval, or oversized from a previous spin-out
- The brake drum surface is grooved beyond the manufacturer’s maximum diameter
- The wheel studs are loose, stripped, or showing thread damage
- The hub has been overheated to the point of blueing
Complete hub assemblies with bearings, races, seal, and pre-installed studs are available as bolt-on replacements. Check the trailer hub and bearing catalog for assemblies matching your axle capacity, bolt pattern, and brake size.
References
- Trailer Hub Bearing Replacement — Complete Walkthrough Video (YouTube)
- Timken Bearing Maintenance Handbook — Tapered Roller Bearing Installation and Preload
- NTRA (National Trailer and Towing Association) — Trailer Hub Servicing Guidelines
- MrLiuAxle — Trailer Axle Bearings, Hubs, and Replacement Parts
Need Replacement Bearings or a Complete Hub Kit?
MrLiuAxle stocks bearing sets, pre-greased hub kits, and complete hub-and-drum assemblies for 2,000 lb to 7,000 lb axles. All bearings meet or exceed ABEC-1 tolerances. Orders ship within 24 hours.